Simplified View Controller
Motivation
A common topic in discussions about iOS software architecture is the issue of massive View Controllers. There seems to be a notion that the Model-View-Controller architecture is to blame. But is it really? Maybe the problem stems from a common misunderstanding of the three layers of MVC. The thinking might be:
Where do we place our business logic? Obviously, it's not View code, since we don't display it on screen. And it’s definitely not Model code, because Model is for our database and entities. Therefore, business logic must be implemented in the Controller.
In my opinion, the Model is actually everything that is not related to the View. It's the right place for business logic and networking. In fact, most of an app's code should be Model code. Since that’s a lot, it's a good idea to further refine the architectural structure within the Model.
View code should be simple to place. However, I have seen so many projects where View code is implemented in the ViewController: Fonts and colors are set. Constraints are defined. Views are added, shown, hidden, or removed. Constraints are set. Animations are performed. That’s a lot of code. No wonder ViewControllers are massive! The reason for this may be another misunderstanding:
The view property of a UIViewController is of type UIView!. This implies that I cannot subclass it. Plus, I am using a storyboard, so the view is out of my control anyway. Therefore, all my styling code needs to be in the ViewController class.
Of course, this is wrong. In fact, we can absolutely create a subclass for the view, and we should. A custom view subclass is the perfect place for styling, constraints, and animations. Custom view classes play very well with storyboards; just remember to set the custom class property in the Identity Inspector.
If we move Model code (business logic, networking, ...) and View code (styling, constraints, animations, ...) out of Controllers, they will become tiny. The only code left in the controller should be code related to lifecycle (viewWillAppear, viewDidDisappear, and the like) and maybe some navigation logic.
Refactoring
Let's investigate using a tiny sample project. We start with a screen that displays a number. There are buttons for incrementing and decrementing that number. Even though the model has been separated out into its own class, the viewController is quite massive. Can you spot the code related to view styling and business logic?
class CounterViewController: UIViewController {
    let model = Dependencies.model
    private var cancellables: Set<AnyCancellable> = []

    override func viewDidLoad() {
        super.viewDidLoad()
        bind(view)
    }

    // MARK: - Outlets

    @IBOutlet private weak var label: UILabel!
    @IBOutlet private weak var infoLabel: UILabel!

    // MARK: - Actions

    @IBAction func increment() {
        model.increment()
    }

    @IBAction func decrement() {
        model.decrement()
    }

    // MARK: - Private

    private func bind(_ view: UIView) {
        model.$value
            .sink { [weak self] count in
                guard let self else { return }
                self.label.text = "\(count)"
                self.infoLabel.text = count.isMultiple(of: 2) ? "Even" : "Odd"
                self.label.textColor = switch count {
                    case 0:    .black
                    case 1...: UIColor(red: 0.1, green: 0.7, blue: 0.05, alpha: 1)
                    default:   .red
                }
                self.animateLabel()
            }
            .store(in: &cancellables)
    }

    private func animateLabel() {
        UIView.animate(withDuration: 0.1) {
            self.label.transform = CGAffineTransform(scaleX: 1.3, y: 1.3)
        } completion: { _ in
            UIView.animate(withDuration: 0.1) {
                self.label.transform = .identity
            }
        }
    }
}
Admittedly, this may not look too bad, but we are dealing with a tiny demo example. In real-world scenarios, the complexity of view controllers can get out of control pretty quickly. Let's pick a well-known architectural pattern to simplify our code: MVVM (Model-View-ViewModel).
MVVM: Extract Model Code
A ViewModel provides properties with data to be displayed by the view. The view should observe changes to stay up-to-date, which makes Combine Publishers a great choice:
final class ViewModel {
    private let model = Dependencies.model

    // MARK: - View Properties
    lazy private(set) var value = model.$value.map { "\($0)" }
    lazy private(set) var info = model.$value.map(infoText)
    lazy private(set) var labelColor = model.$value.map(color)
}
We implement two action methods for handling user input:
// MARK: - Actions
extension ViewModel {
    func increment() {
        model.increment()
    }

    func decrement() {
        model.decrement()
    }
}
Finally, we add a private extension with value mappings for the previously declared info and labelColor properties:
private extension ViewModel {
    func infoText(for count: Int) -> String {
        count.isMultiple(of: 2) ? "Even" : "Odd"
    }

    // Here we actually leak styling-related code into our ViewModel. We
    // should not prescribe color values, but let's run with it for now...
    func color(for count: Int) -> UIColor {
        switch count {
            case 0:    .black
            case 1...: .green
            default:   .red
        }
    }
}
Our updated ViewController:
class CounterViewController: UIViewController {
    @IBOutlet private weak var label: UILabel!
    @IBOutlet private weak var infoLabel: UILabel!

    let viewModel = ViewModel()
    private var cancellables: Set<AnyCancellable> = []

    override func viewDidLoad() {
        super.viewDidLoad()
        bind(view)
    }

    @IBAction func increment() {
        viewModel.increment()
    }

    @IBAction func decrement() {
        viewModel.decrement()
    }

    private func bind(_ view: UIView) {
        viewModel.value.sink { [weak self] count in
            self?.label.text = count
            self?.animateLabel()
        }.store(in: &cancellables)

        viewModel.info.sink { [weak self] info in
            self?.infoLabel.text = info
        }.store(in: &cancellables)

        viewModel.labelColor.sink { [weak self] color in
            self?.label.textColor = color
        }.store(in: &cancellables)
    }

    private func animateLabel() {
        UIView.animate(withDuration: 0.1) {
            self.label.transform = CGAffineTransform(scaleX: 1.3, y: 1.3)
        } completion: { _ in
            UIView.animate(withDuration: 0.1) {
                self.label.transform = .identity
            }
        }
    }
}
MVVM: Extract View Code
Maybe the improvement in code size is a bit disappointing. In fact, there is quite a bit of View code left over. We move the animateLabel method into a new UIView subclass and add properties for the values to be displayed:
final class CounterView: UIView {
    @IBOutlet private weak var label: UILabel!
    @IBOutlet private weak var infoLabel: UILabel!

    var count: String? {
        get { label.text }
        set {
            label.text = newValue
            animateLabel()
        }
    }

    var info: String? {
        get { infoLabel.text }
        set { infoLabel.text = newValue }
    }

    var textColor: UIColor? {
        get { label.textColor }
        set { label.textColor = newValue }
    }

    private func animateLabel() {
        UIView.animate(withDuration: 0.1) {
            self.label.transform = CGAffineTransform(scaleX: 1.3, y: 1.3)
        } completion: { _ in
            UIView.animate(withDuration: 0.1) {
                self.label.transform = .identity
            }
        }
    }
}
We update the ViewController to use the custom view:
class CounterViewController: UIViewController {
    @IBOutlet private weak var counterView: CounterView!

    let viewModel = ViewModel()
    private var cancellables: Set<AnyCancellable> = []

    override func viewDidLoad() {
        super.viewDidLoad()
        bind(view)
    }

    @IBAction func increment() {
        viewModel.increment()
    }

    @IBAction func decrement() {
        viewModel.decrement()
    }

    private func bind(_ view: UIView) {
        viewModel.value.sink { [weak counterView] count in
            counterView?.count = count
        }.store(in: &cancellables)

        viewModel.info.sink { [weak counterView] info in
            counterView?.info = info
        }.store(in: &cancellables)

        viewModel.labelColor.sink { [weak counterView] color in
            counterView?.textColor = color
        }.store(in: &cancellables)
    }
}
Our ViewController has been simplified quite nicely now. However, the current version is chock-full of silly boilerplate code that does not do anything. We just observe changes in the viewModel and pass them on to the view. And we receive actions from the view and pass them on to the viewModel. This class does not provide any value at this point. Unfortunately, we cannot fix it... yet.
Remove Boilerplate
The boilerplate code in the ViewController adds a layer of separation between counterView and viewModel. This is redundant; the role of separating view from model is already provided by the viewModel. It would be nice to remove the ceremony and connect counterView directly to viewModel. There is actually a tool for this purpose: Custom storyboard objects. They are implemented as classes deriving from NSObject. We can add @IBOutlet and @IBAction annotations for storyboard connections.
For this demo, let's split the ViewModel into two classes. We could keep the ViewModel intact, but splitting it demonstrates a different architectural approach where data flows only in one direction. And the split approach illustrates how to use multiple custom objects in a storyboard.
The first object is the Presenter, providing current state for the view to display. Data flows unidirectionally from the Model to the View:
class Presenter: NSObject {
    let model = Dependencies.model

    @IBOutlet weak var view: CounterViewProtocol? {
        didSet {
            guard let view else { return }
            bind(view)
        }
    }

    lazy private(set) var value = model.$value.map { "\($0)" }
    lazy private(set) var info = model.$value.map(infoText)
    lazy private(set) var labelColor = model.$value.map(color)

    private func bind(_ view: CounterViewProtocol) {
        value.sink { [weak view] value in
            view?.count = value
        }.store(in: &cancellables)

        info.sink { [weak view] info in
            view?.info = info
        }.store(in: &cancellables)

        labelColor.sink { [weak view] color in
            view?.textColor = color
        }.store(in: &cancellables)
    }

    func infoText(for count: Int) -> String {
        count.isMultiple(of: 2) ? "Even" : "Odd"
    }

    func color(for count: Int) -> CounterColor {
        switch count {
        case 0:    .zero
        case 1...: .positive
        default:   .negative
        }
    }

    private var cancellables: Set<AnyCancellable> = []
}
The view property is connected to the view in the storyboard via an @IBOutlet. In this case, we don't work with the concrete view class. Instead, the following CounterViewProtocol provides an interface:
@objc protocol CounterViewProtocol {
    var count: String? { get set }
    var info: String? { get set }
    var textColor: CounterColor { get set }
}
The second class is the Interactor. It receives @IBActions from the view, performs some business logic, and updates the model. Data flows unidirectionally from the view to the model.
class Interactor: NSObject {
    let model = Dependencies.model

    @IBAction func increment() {
        // OK, not a lot of business logic here...
        model.increment()
    }

    @IBAction func decrement() {
        model.decrement()
    }
}
Now we can remove the ViewController boilerplate.
🥁 drum roll 🥁
Behold the magnificence of this mighty massive controller:
class CounterViewController: UIViewController { }
Yes, this is all the controller code needed for this demo app. In fact, we could use a UIViewController instance directly instead of a subclass, but having a separate type for each scene may be useful when debugging.
Storyboard Update
Before we can test our new code, we need to update the storyboard. First, remove any existing outlet and action connections.
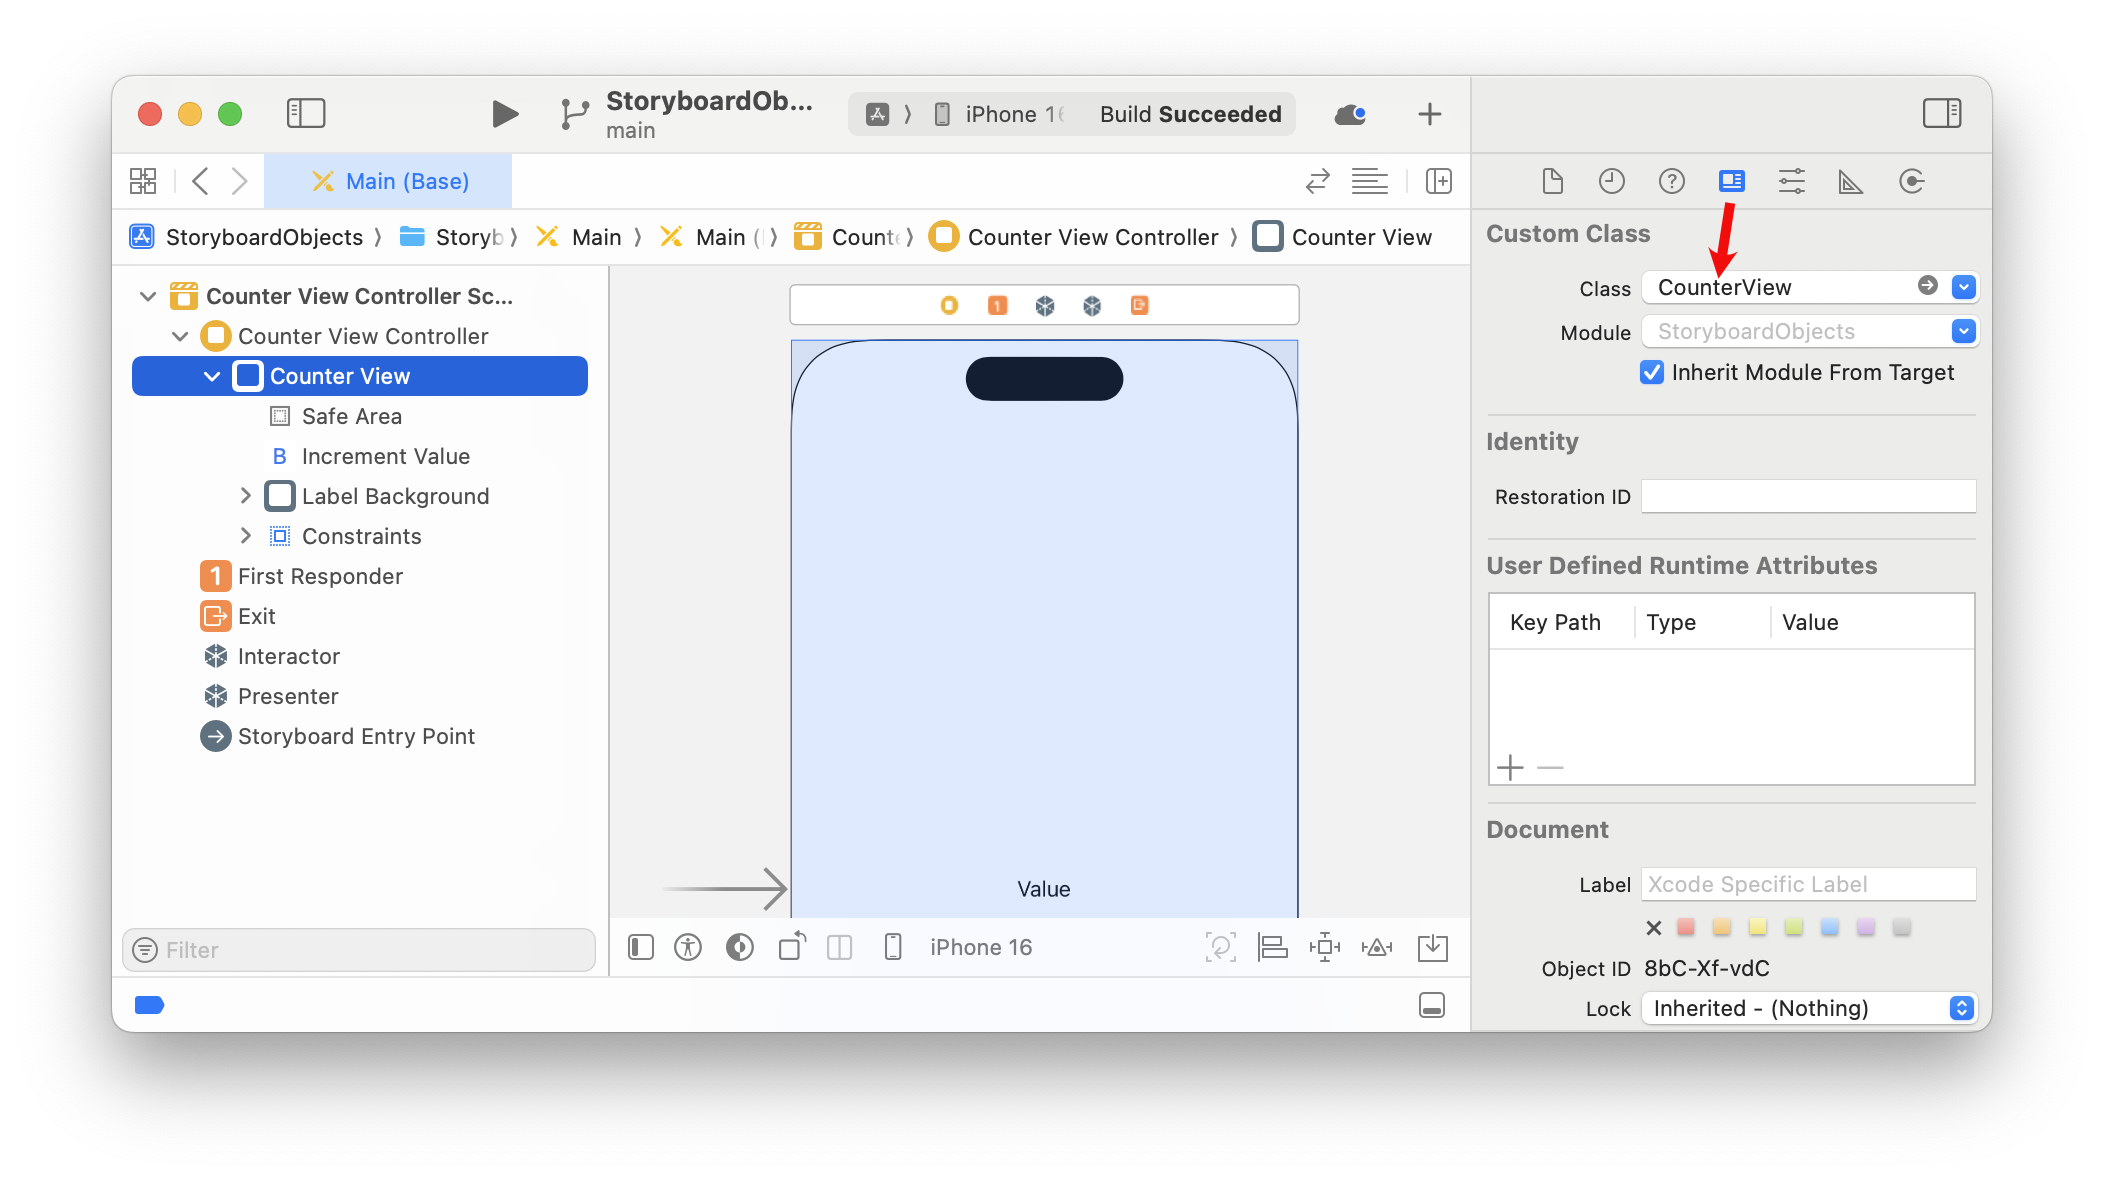
Step 1: Set Custom Class of the View
By default, the view of a viewController is a UIView instance. We want to make sure that our customized CounterView is created when the view loads. We can do this by setting the custom class in the view's Identity Inspector:
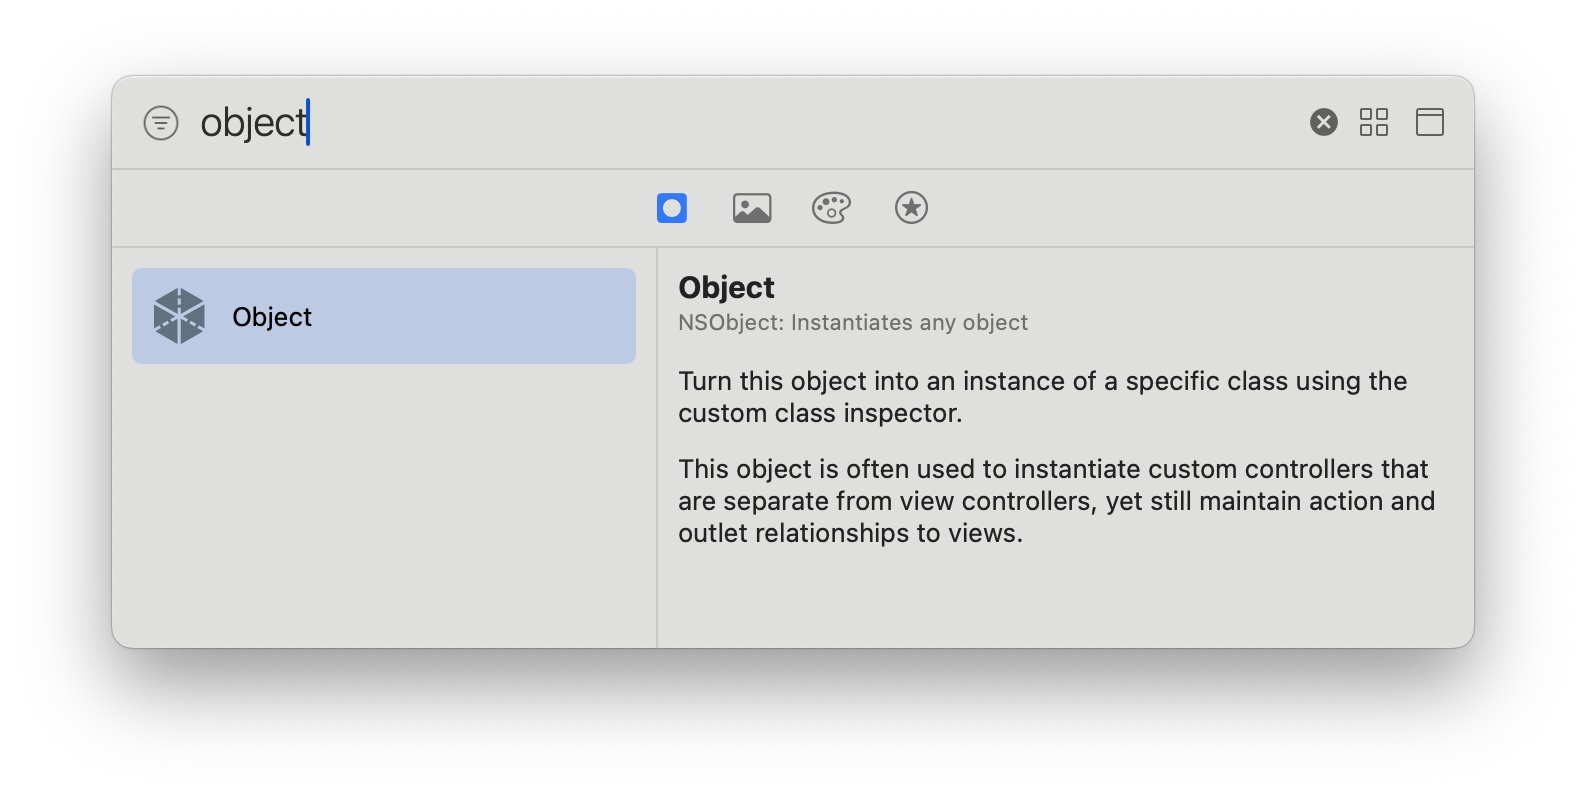
Step 2: Add Custom Objects
Drag an Object from the Views Library into your scene. Make sure it is selected. Set the custom Class to Presenter in the Identity Inspector. Repeat this process for the Interactor.
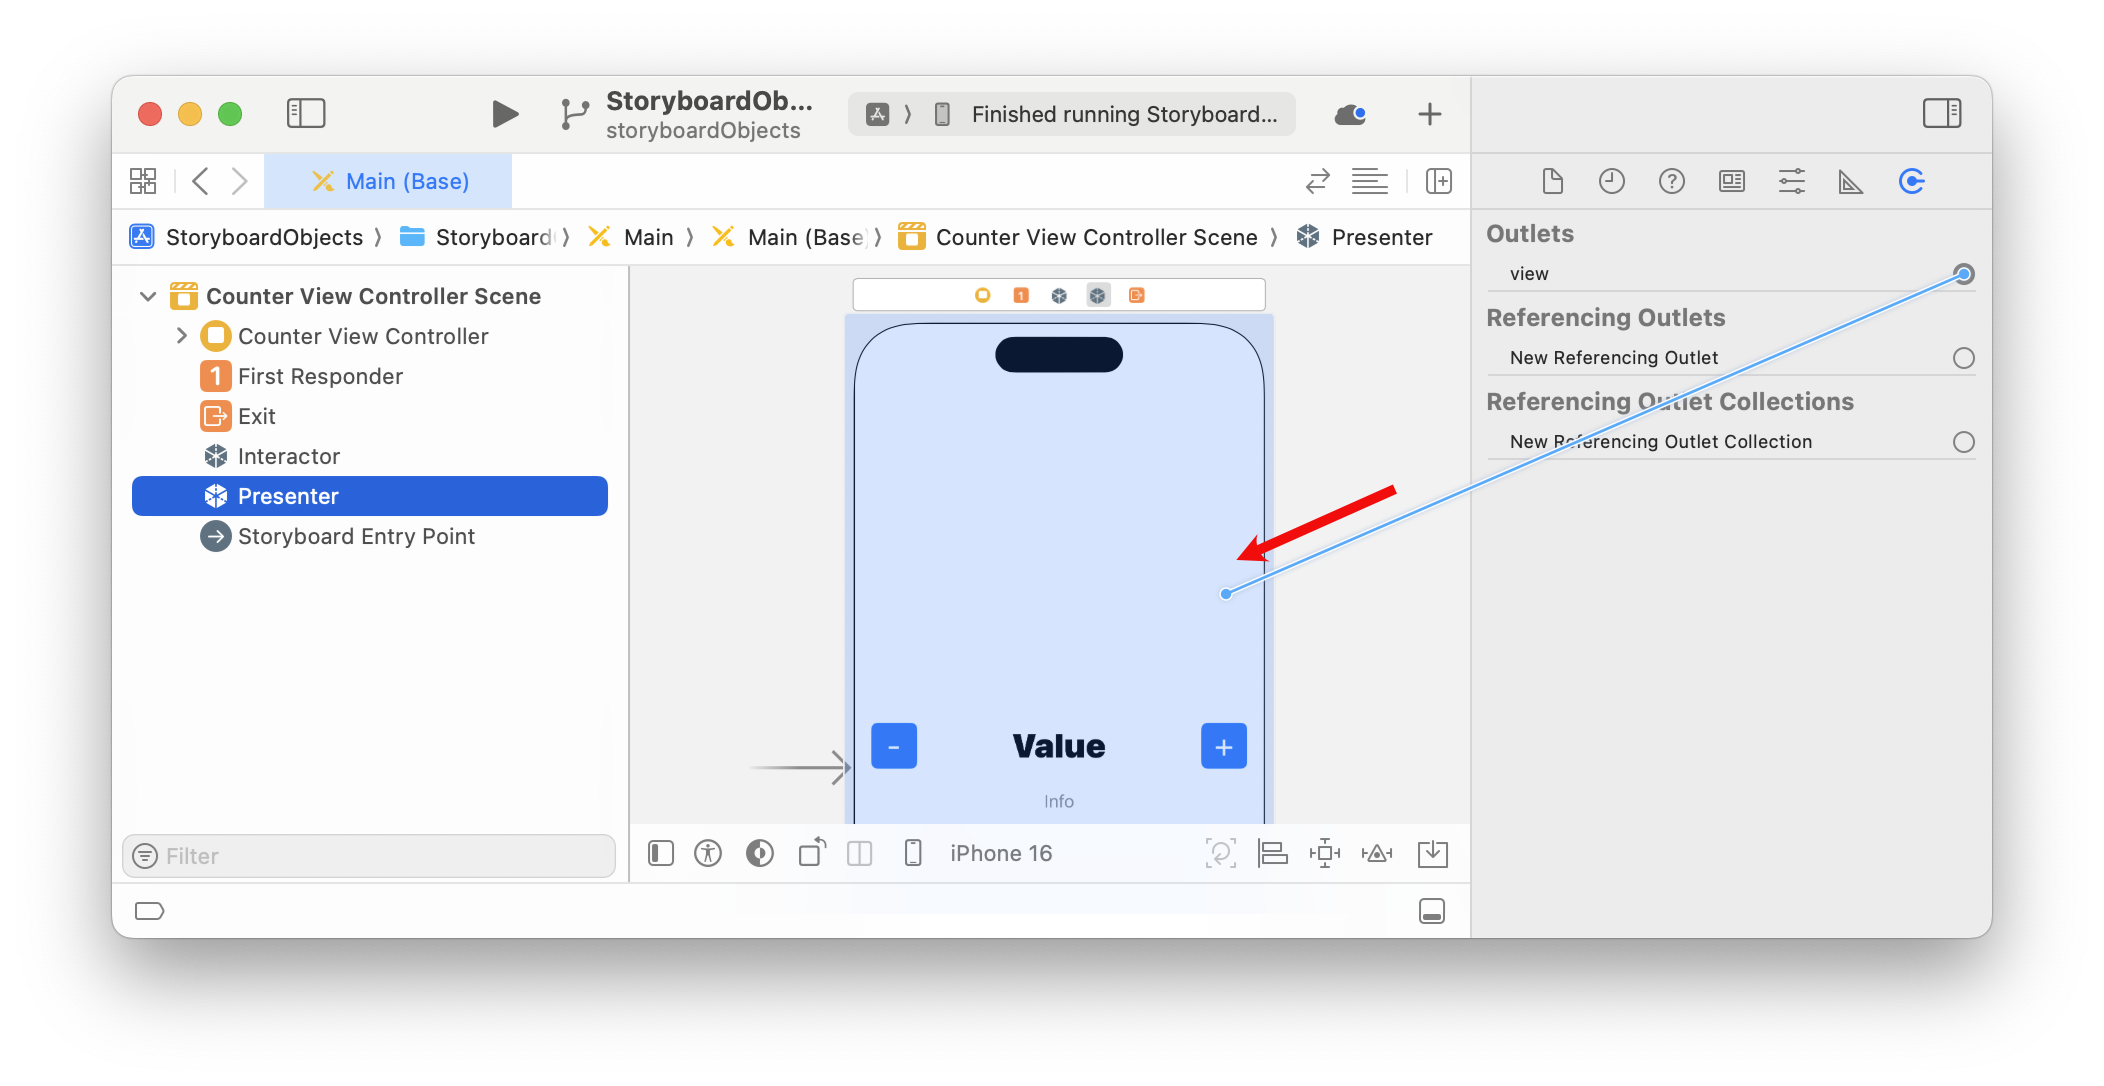
Step 3: Connect Outlets
Drag an outlet connection from Presenter.view to the CounterView. Connect the label and infoLabel outlets in CounterView to the labels in the storyboard.
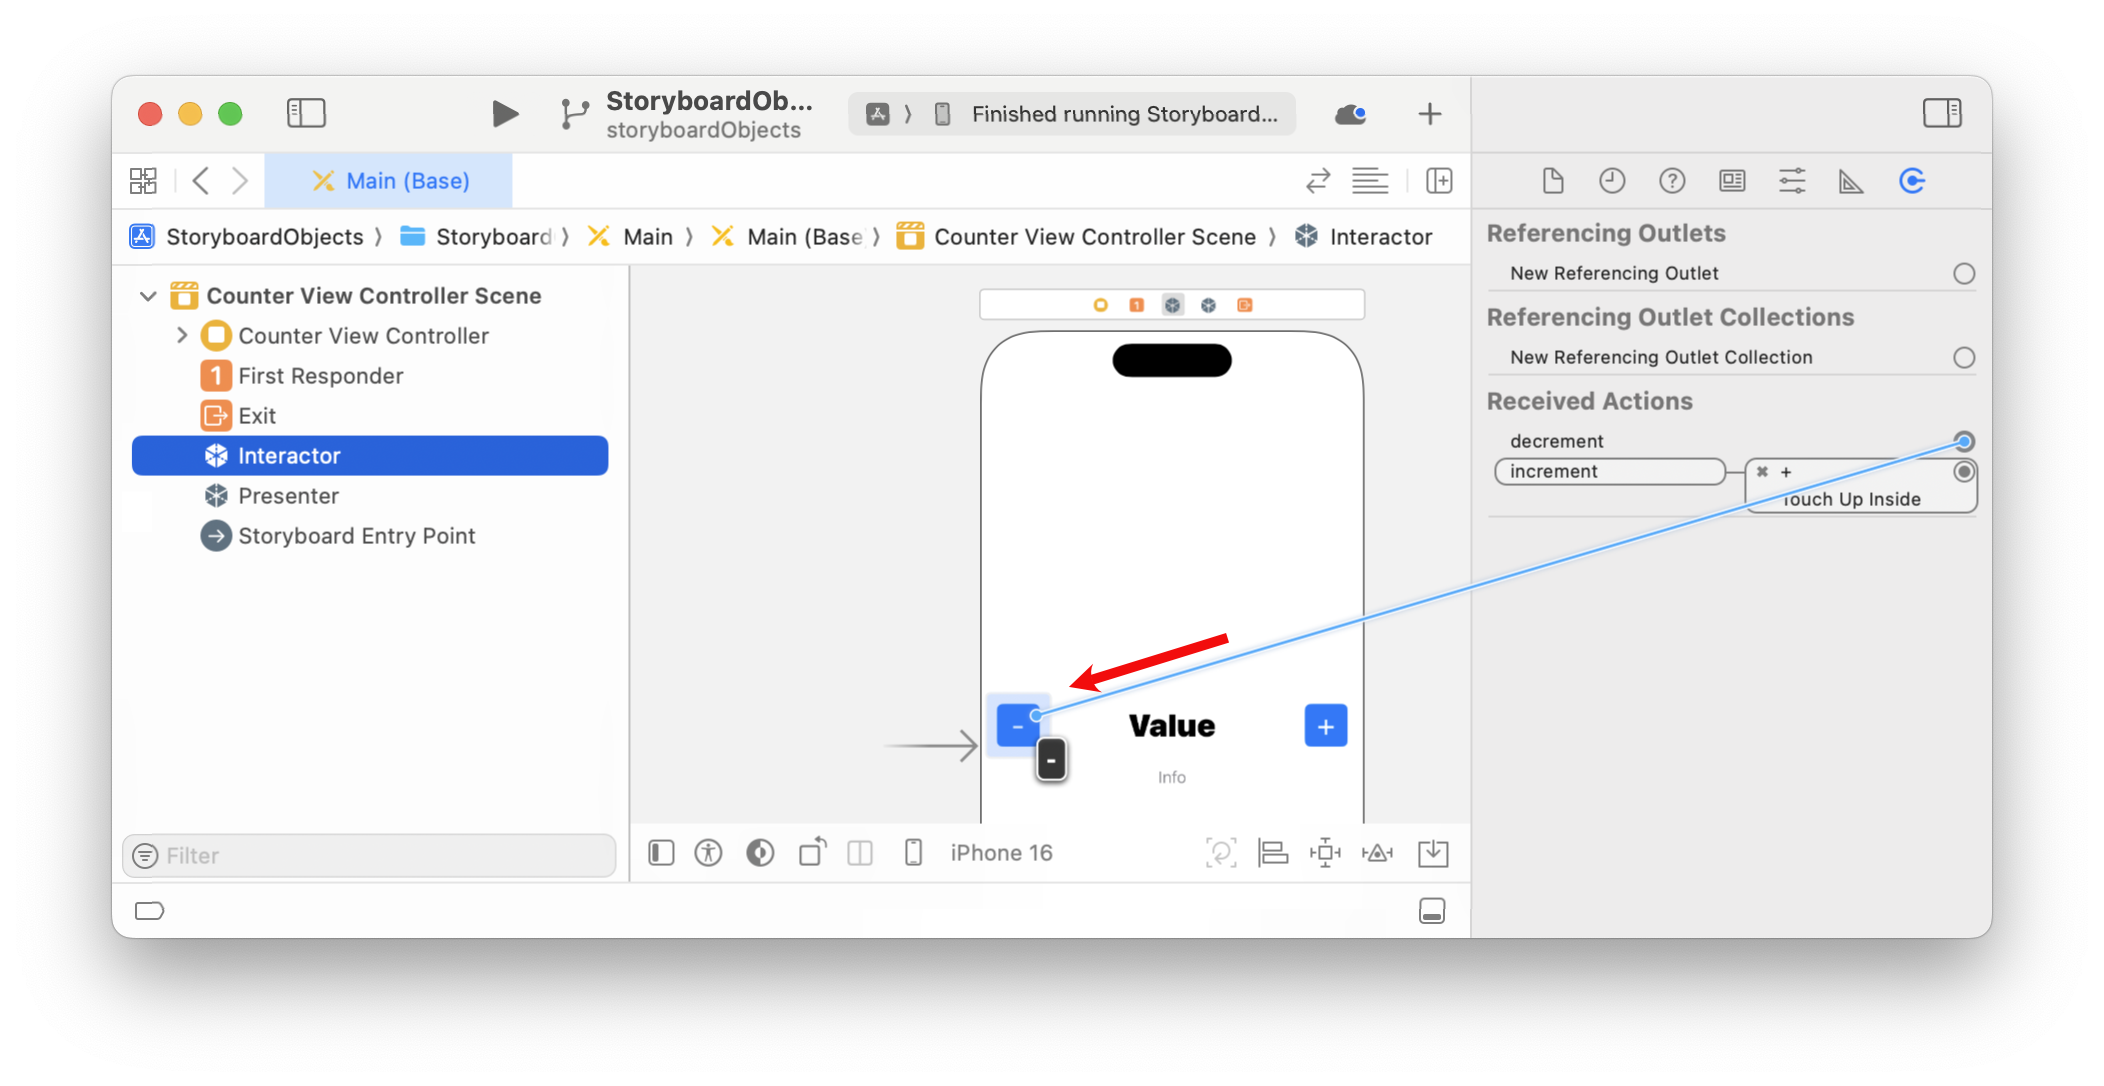
Step 4: Connect Actions
Establish the connections between buttons and the Interactor's @IBAction methods.
Build and run!
Conclusion
Custom Objects in storyboards are a powerful tool to dramatically simplify view controllers. We can connect view models, or interactors and presenters as shown in this demo. Custom objects are created automatically when the scene is loaded from its storyboard. However, this only works for classes with an initializer without any parameters. Any dependencies must be provided by some other means.
Nib/Xib files for views have an interesting additional feature: Proxy Objects. These are not instantiated automatically when loading the view. We have to manually create these objects and provide them in the options dictionary when loading the nib. This way we have all the freedom to create and configure objects as needed. However, the dictionary-based API is very clunky; see UINib.instantiate(withOwner:options:).